Home :: ZePlanner User Manual
ZePlanner User Manual
This is the user manual, which will aid you in working with ZePlanner staff scheduling.
Please click on the respective keywords to be directed to the corresponding chapter.
-
 1. Introduction
Efficiency is definitely one of the vital characteristics of today’s business administration. Team Zweieck has therefore designed ZePlanner as a workforce management software focusing on this essential quality. ZePlanner staff scheduling thus offers a swift, user-friendly and clearly structured way of planning your staff assignments.
Every company in the service industry can profit from the ZePlanner as regards workforce management .The straightforward handling and uncomplicated data management that characterize ZePlanner will significantly reduce the amount of time and effort invested in the organisation of your staff scheduling.
Any member of the administration staff can access the ZePlanner data, which are presented in real-time. Consequently, changes of appointments can be announced immediately. Owing to its easy accessibility and clear structure, ZePlanner is an indispensable part of a successful and efficient staff scheduling.
ZePlanner – Staff Scheduling Software manages the most valuable part of your company – your staff.
-
2. The idea behind it
Many kinds of software deal with staff scheduling as well as task assignment. However, ZePlanner workforce management software stands out among other similar programs.
What makes the ZePlanner special?
The main difference to other staff scheduling software is the timetable, the core of the ZePlanner. As a timetable software it offers all necessary information at a single glance, such as staff presence and order allocation. The high usability and visual clarity of ZePlanner allows you to customize the design and arrangement of the timetable according to your own individual needs.
In addition to a description, an order also contains full client and property details. As a result, the user profits from an integrated client database. Recurring orders can thus easily access the existing data by means of extensive search options. It is the user who decides which data will be saved.
Assign your orders in a quick and easy way. Just click on an order and pull it over to the field of the respective employee – the graphic solution with its drag&drop-function will make the cumbersome entering of time and duration a thing of the past.
With ZePlanner staff scheduling, necessary adjustments will be minimal. Its easy handling and the synchronizing function which incorporates your existing data into its database render ZePlanner a program which does not pose any operating difficulties, not even at the very beginning. Discover how uncomplicated workforce management can be!
ZePlanner staff scheduling offers a straightforward, clear and timesaving way to manage your staff assignments – just see for yourself!
-
3. Technical information
System software
ZePlanner – Staff Scheduling Software works with the following operating systems:
- Windows Vista, Windows XP, Windows 2000, Windows 98
as well as
- SuSE Linux 10.2 und higher, Ubuntu, Fedora
The porting into further operating systems is being planned.
Databases
The standard version works with the following databases:
Microsoft Access, MySQL, SQLite, MSSQL-Server, PostGres
It is not an issue if you require a different database as long as the corresponding ODBC-driver is available. Connections to Oracle and many others are thus possible.
-
4. Installation
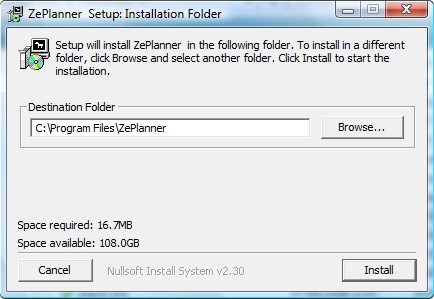
You will need approx. 15 MB free disk space in order to install ZePlanner – Staff Scheduling Software.
Start the installation process by double-clicking on the file zeplanner_setup.exe.
Select the directory where you want the program to be installed. Start the installation by clicking on Install.
ZePlanner staff scheduling is equipped with a hardware protection device (dongle) against pirating. Plug the dongle into a USB-port. The Windows hardware assistant should open after a few seconds and install the driver automatically. You can find the dongle drivers in \ZePlanner\drv-usb in case this fails.
 Now you can see the ZePlanner icon on your desktop. Now you can see the ZePlanner icon on your desktop.
Click on this icon to start ZePlanner scheduling software.
-
5. Administrator account
In order to ensure the safety and traceability of your data, all processes are linked to the respective user via the login into ZePlanner staff scheduling software. As a result, the processes are always traceable.
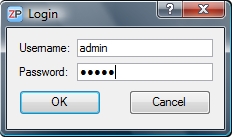
Upon opening ZePlanner, the Login-window will appear.
Enter “admin” in the box next to Username and “admin” into the one next to Password as well. Please note that the Username-box does not distinguish between capitalized and lower case letters whereas the Password-box does.
You are now logged in as the administrator. You should change your access data as the administrator in order to ensure optimal security.
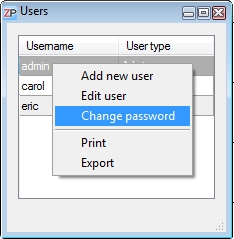
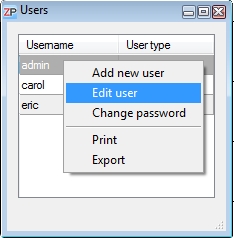 Go to the menu Settings –> Users. Double-click on Admin in the window Users and change your username. Go to the menu Settings –> Users. Double-click on Admin in the window Users and change your username.
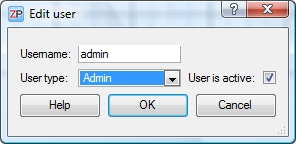 Select Admin as the user type. Make sure the box active is ticked and confirm with OK. Select Admin as the user type. Make sure the box active is ticked and confirm with OK.
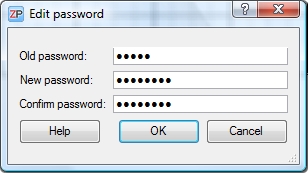
Right-click on your username and select Change password. Change your password and keep it safe!
As the administrator, you possess all rights and the responsibility for many configurations.
-
6. Add a user
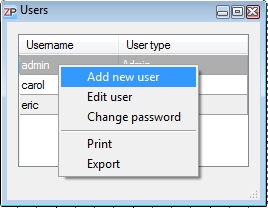
In order to add a new user, go to the menu Settings –> Users.
Right-click in the window Users and select Add new user.
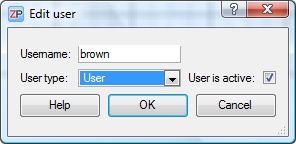
Enter a username.
Select User in the box User type and make sure that the little box User is active is ticked.
User types
Administrator: This kind of user can access and edit all configurations and data. Only the administrator may edit system configurations.
User: This user can access his or her own user configurations only. Entering new client data and orders as well as changing existing ones is possible. However, the system configurations and the order calculations are not accessible.
Guest: A guest may only view data, i.e. the timetable and the entered orders. Editing of data or orders is not possible, but printing of orders is.
 Please note: Please note:
If you enter a new username, e.g. “brown”, then the password will automatically be “brown” until the user changes it. The box Username does not distinguish between capitalized and lower case letters, which is why the username and the first, automatically generated password will be written in lower case.
-
7. Enter data
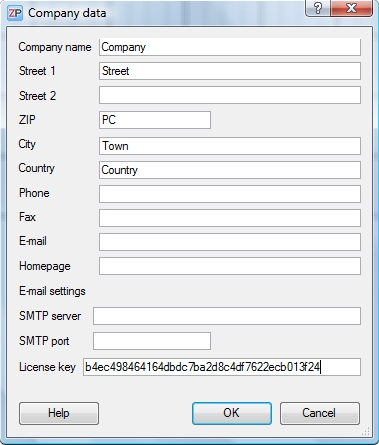
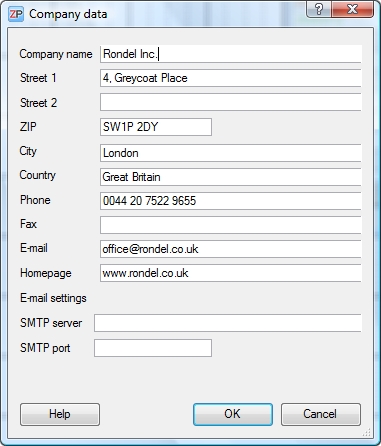 Enter company data Enter company data
Go to Settings –> Company data and enter the necessary information about your company. These data will appear on your work orders.
E-Mail settings
You can send E-mails and text messages via ZePlanner – Staff Scheduling Software. In order to use this function, you have to enter a SMTP server. You do not need to enter a SMTP port, since it can be assigned automatically.
SMTP (Simple Mail Transfer Protocol) transfers E-mails in computer networks. You can thus send ZePlanner data per E-mail. The Mail User Agent organizes the SMTP process and establishes a connection to a SMTP server (or MSA Mail Submission Agent). The Mail Submission Agent relays the message to its recipient, possibly via other SMTP-servers (MTA Mail Transfer Agents) such as Hamster, Lotus Domino or XMail. The SMTP server is established by your provider. Contact your network administrator if you experience problems.
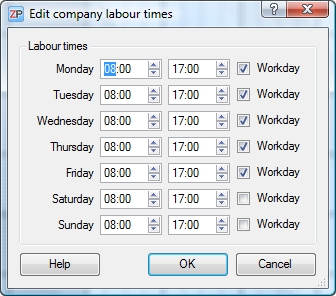 Enter labour times Enter labour times
You can enter your company’s regular labour times if you go to Settings –> Labour time.
You can also determine to which days those regular labour times should apply.
The company labour time forms the basis for the labour time of an employee.
The assignment of individual working hours is explained further below.
This function can be helpful if, for instance, an employee is only available part-time.
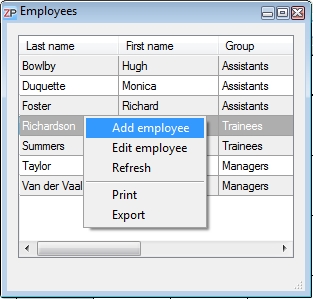 Enter employee Enter employee
Open the window Employees by going to the menu Settings –> Employees.
Right-click into the chart in order to open the context menu.
Alternatively, you can press F4 to arrive at the context menu.
Please select Add employee.
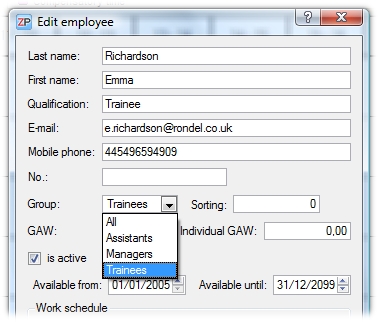
After the window Edit employee opens, you can enter the data of the respective employee. The boxes Last name, First name and Qualification will be displayed in the timetable.
The No. box is provided in case you would like to synchronize ZePlanner with an existing employee databases which includes personnel numbers.
The contact details of an employee will be connected to each order assigned to that particular person. Thus, you can send the assigned orders directly to the responsible employee via E-mail, for instance.
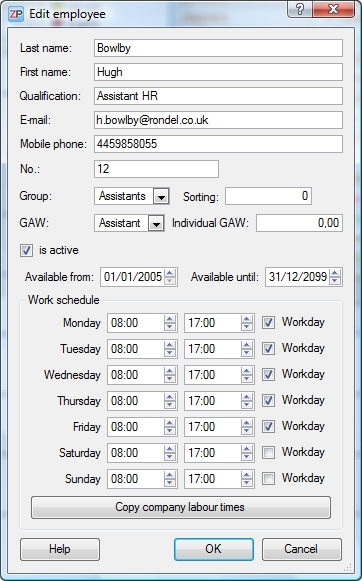 GAW (=Gross average wage) GAW (=Gross average wage)
You can determine the gross average wage for each employee individually or you can assign the employee to a gross average wage group. This is necessary for the order costing. Please go to the chapter on order costing for more information.
The boxes Group and Sorting are significant for the administration of groups. The usage of groups will be explained in the next chapter.
You can activate or deactivate an employee by ticking the box active. This feature is useful in the case of temporarily hired employees. The boxes Available from/until serve the purpose of displaying the employee in the timetable. If, for instance, you hire a summer intern but enter his or her details sooner than the internship starts, you can use the Available from/until line to determine in what period the employee will be displayed in the timetable.
In the Work schedule section, you can adjust the labour time for each employee individually, if need be. If regular labour times apply, then you can copy them by clicking on the button Copy labour time. Individual labour times may have an effect on the timetable graphics as well. For instance, the free time of an employee will be marked by horizontal lines in the respective time slots.
Click on OK in order to save your employee data.
Repeat the steps described above until you have entered all your employees.
-
8. Working with ZePlanner
Print
You can print out all documents and overviews from ZePlanner staff scheduling. Click on the button Print and the Print window will appear where you can select the printer and the printer settings.
Alternatively, you can print overviews and other documents if you go to the menu File –> Print or if you use the key shortcut Ctrl+P. You can also choose the print function from the context menu.
Export
You can export all charts except for the Order overview as a .csv-file. Right-click in the respective chart and select Export in the context menu. A window will appear where you can select the target directory and enter a file name.
Key shortcuts
Every chart in ZePlanner can work with a set of key shortcuts, which you can find in the menu Edit.
The following general key shortcuts exist:
- Edit – F6
- Copy – Ctrl+C
- Cut – Ctrl+X
- Paste – Ctrl+V
- Undo – Ctrl+Z
- New – Ins
- Delete – Del
- Refresh – F5
- Context menu – F4
There are further key shortcuts in the File, Orders and Help menus.
- Print – Ctrl+P
- Close – Ctrl+W
- Quit – Ctrl+Q
- New order – F2
- Order costing – F3
- Help – F1
-
9. Currencies
You can choose the currency you want ZePlanner to use in the order display and order costing.
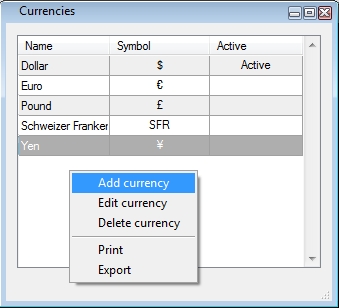
Several currencies are pre-installed, but you can also create different ones by going to Settings –> Currencies.
In order to choose a currency, you have to activate it.
Right-click on the currency you would like to activate. The currency editor will appear.
Check the box Active currency in order to activate the currency.
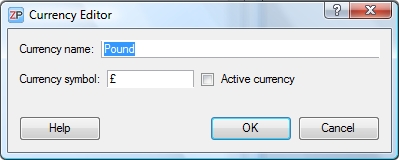
If you would like to add another currency, please right-click into the window Currencies and select Add currency.
The currency editor will appear, where you can insert the name and the symbol of the new currency and determine its activation status.
-
10. Group administration
 Create groups Create groups
The ZePlanner is a staff scheduling software suitable for any kind of company.
Since every company is structured differently, the ZePlanner possesses an integrated group administration function.
This feature allows you to classify your employees according to the individual structure of your company.
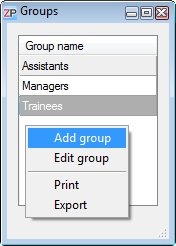
In order to create a group, go to the menu Settings –> Groups. The window Groups will appear.
You can open the context menu with a right-click in the window or by pressing the F4 key.
Select Add group to add a group.

Enter the name of the group and confirm with OK.
The number of groups is not limited, but please note that an employee can be assigned to one single group only.
 Rename groups Rename groups
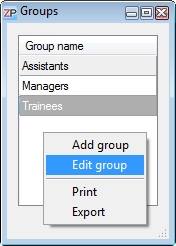
In order to rename a group, you have to select it with a double-click first.
You can also select Edit group in the context menu, which can be accessed by right-clicking on the group.
 Assign groups Assign groups
The assignment of groups is part of the employee data. Go to the menu Settings –> Employees. The window Employees will appear.
Double-click on an employee to edit his or her data. You can also right-click on an employee in the chart and select Edit employee from the context menu.
The window Edit employee will appear. In the box Group, you can select a group and assign it to the employee.
Attention: An employee can be assigned to one group only!
The group All is a superordinate group with special characteristics.
- All employees are automatically represented in the group All.
- The sorting sequence is not observed in this group. Instead, the employees remain in alphabetical order.
The box Sorting serves the sorting sequence within a group (except for All). You can enter an arbitrary number. The representation in the timetable will start with the smallest number at the top and go down to the largest number at the bottom.
Example:
Employee1 Group: Trainees Sorting: 7
Employee2 Group: Trainees Sorting: 4
Employee3 Group: Trainees Sorting: 12
Representation in the timetable under Group Trainees:
Employee2 Group: Trainees Sorting: 4
Employee1 Group: Trainees Sorting: 7
Employee3 Group: Trainees Sorting: 12
-
11. Holidays
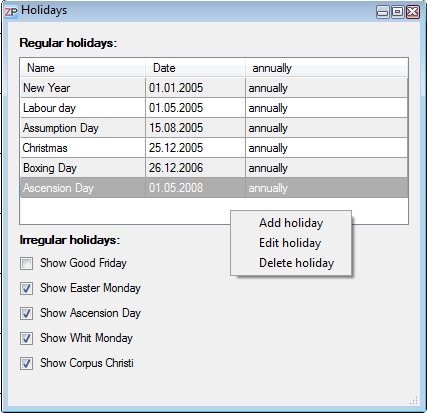
Go to Settings –> Holidays to select which holidays will be accounted for in the timetable.
You can adapt the settings to your personal preferences and to the regional requirements.
The default setting corresponds to the Austrian calendar.
Right-click to open the context menu through which you can add, edit or delete a holiday.
If you tick the box annual, then the holiday will be displayed every year.
You can also select which irregular holidays the timetable will display.
-
12. User settings
Go to the menu Settings –> User settings to change your user settings.
The user settings include the following:
- Timetable
- Timetable headings
- Colours
- Fonts
- Tray
- Order overview
- Order columns
Timetable tab
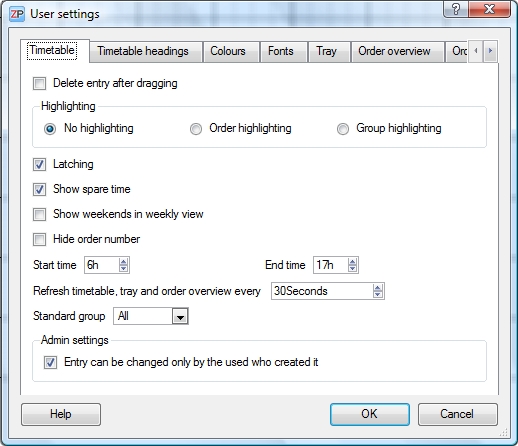
Delete entry after dragging
This function determines what happens after you drag an entry from the timetable into the tray or the order overview.
- If the box is ticked, then the timetable entry is shifted into the other window and does not remain in the timetable.
- If the box is not ticked, the timetable entry is copied into the other window. It will remain in the timetable as well.
Flagging
You can flag certain orders in the timetable by using different colours. The default setting is No flagging. If you select order flagging, then all entries of one order will be marked in the same colour. If you select group flagging, then the entries of one order will only be marked in the same colour if they had been copied by Ctrl+click (in contrast to a repeated drag&drop of the order from the order overview into the timetable).
Latching
The latching function allows the positioning of entries in the timetable within a 15-minute grid during the dragging.
Show spare time
You can determine whether the time not included in labour time (spare time) will be displayed. If you select Show spare time, then the spare time will be displayed in the respective colour.
Show week-ends in weekly overview
If this box is ticked, then Saturdays and Sundays will be displayed in the weekly overview as well.
Hide order number
If this box is ticked, the order numbers of the entries in the timetable will be hidden.
Starting time/End time
You can choose which time section of the day will be displayed in the timetable.
Refresh timetable, tray and order overview every…
ZePlanner is a network-oriented software, which is why the data at the individual workstations are refreshed in regular intervals. After the time selected here passes, the timetable, the tray and the order overview will be refreshed. The default value is 30 seconds. You can adapt this time to your own requirements.
Standard group
You can specify a standard group, which will be the one displayed automatically whenever the timetable opens.
Administrator configurations
As the administrator, you can select whether an entry may only be changed by the user who created it.
Timetable headings tab
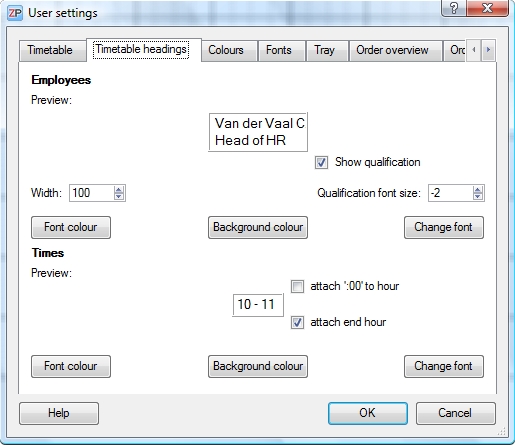
Employee / Show qualification
This function displays the name of the employee and the corresponding qualification.
Employee / Qualification font size
If you decide to display the qualification, then you can adjust its representation more minutely. You can select a smaller font size than the one used for the employee names. For instance, -1 means that the qualification will be 1 pt smaller in size than the name.
Employee / Width
The width is given in pixels and directly affects the employee sections in the timetable. Select a width small enough so that no timetable space will be wasted unnecessarily and large enough so that the employee names can be displayed well.
Employee / Font colour
Select the font colour for the labelling of the employees in the timetable.
Employee / Background colour
Select the background colour for the labelling of the employees in the timetable.
Employee / Change font
You can change the font and the size for the labelling of the employees in the timetable here.

Select the font and its size. Confirm with OK.
Times / Add ’00’ to time display
If this box is ticked, the time in the timetable will be displayed as 10:00 instead of 10, for instance. The effects can be observed in the pre-view line on the left.
Times / Add end time
If this box is ticked, then the time labels in the timetable will include the end time, e.g. 10-11 or 10:00- 11:00. The effects can be observed in the pre-view line on the left.
Times / Font colour
You can choose the label colour of the timeline in the timetable.
Times / Background colour
You can choose the background colour of the timeline in the timetable.
Times / Change font
Select the label font and size of the timeline in the timetable.
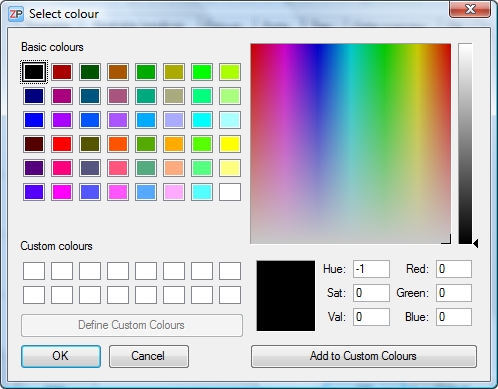
Select the preferred colour or create your own. Confirm with OK.
Colours tab
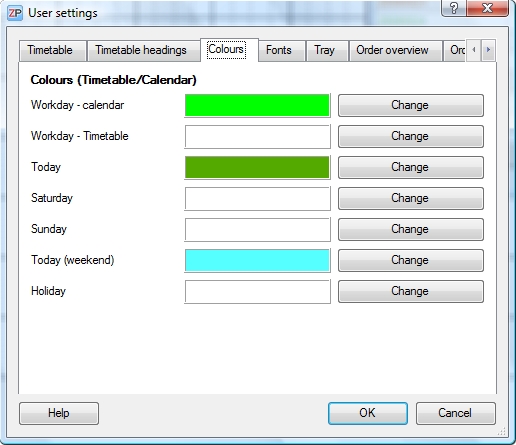
Colours / Workday – Calendar
Change the font colour of workdays in the calendar here.
Colours / Workday – Timetable
Change the background colour of workdays in the timetable here.
Colours / Today
Change the background colour of the current day in the calendar here.
Colours / Saturday
Change the background colour of Saturdays in the timetable and the font colour in the calendar here.
Colours / Sunday
Change the background colour of Sundays in the timetable and the font colour in the calendar here.
Colours / Today (weekend)
Change the background colour for the current day in the calendar, if that day is a Saturday or a Sunday, here.
Colours / Holidays
Change the background colour for holidays in the timetable and the font colour in the calendar here.
Fonts tab
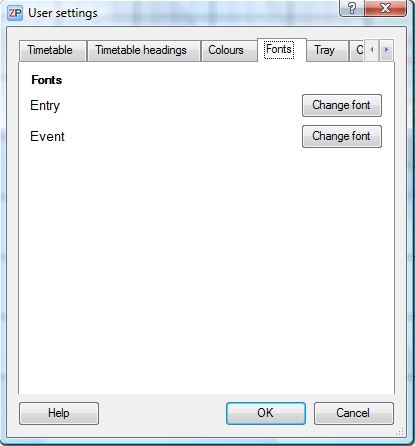
Fonts / Entry
Change the font and font size of an entry in the timetable here.
Fonts / Event
Change the font and font size of an event in the timetable here.
Tray tab
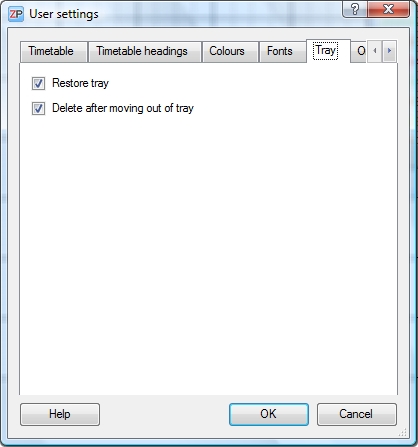
Restore tray
You can determine whether the tray will be restored or cleared after closing and re-opening of ZePlanner. If the box is not ticked, then the tray will be empty upon opening ZePlanner.
Default status: ticked
Delete entry after moving from tray
You can choose whether an entry will be deleted from the tray if you move it from the tray into the timetable. If it is not deleted, then a copy will be created in the timetable. This function is useful if you have to assign an entry multiple times.
Default status: ticked
Order overview tab
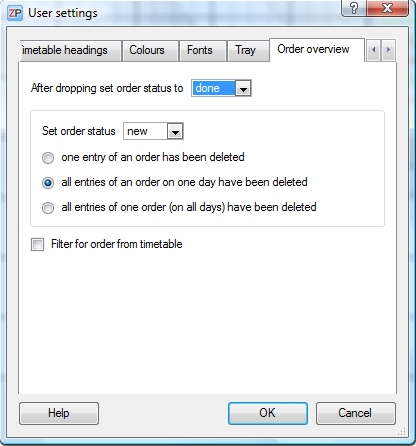
After dropping Set Order Status
This function allows you to determine which status an order will take after it is assigned: urgent, assigned, new, moved or one of your custom statuses. If you leave the box blank, then every new order will automatically possess the status new. You can find more information on custom statuses in the chapter on order statuses.
Set Order Status
You can determine which status will be assigned
- if an entry of this order is deleted
- if all entries of this order on the same day are deleted
- if all entries of this order on all days are deleted
Filter for Order
Tick this box if you want the order overview to display only the order belonging to the entry you select in the timetable. Default status is not ticked.
Order columns tab
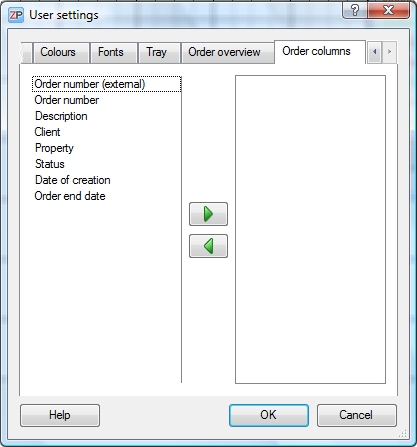
You can determine which columns will be displayed in the order overview here. Move the labels into the right column to add it to the displayed labels. Select a label and click on the arrows to move it.
-
13. Orders
New order
To enter a new order, go to Orders –> New order or press the F2 key.
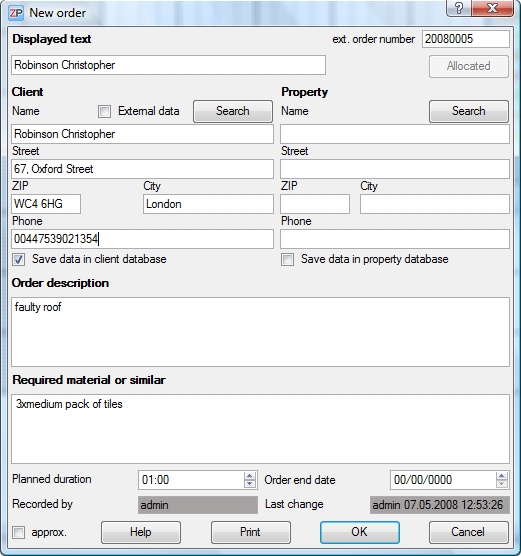
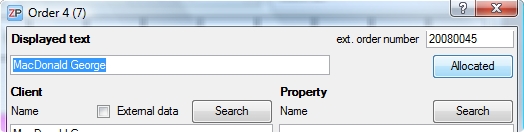
Display text
The text entered here will be displayed in the timetable and in the order overview. It would be best to choose a short and concise text to make co-operation with your colleagues easier. If you don’t enter anything, then the client name will automatically serve as the display text instead.
External order number
You can enter your own order numbers here. This can be done manually or with the synchronising tool ZePlannerSync, which integrates your own existing database into ZePlanner.
In addition to that, every order receives a ZePlanner-internal number in the order overview, which is assigned according to the time of entry of the orders, i.e. the order which was entered first receives the number 1, the next one number 2, etc.
Allocated
The function of this button is explained in the chapter Allocations.
Client sections
You can enter the data (name, street, postcode, town and phone number) of your clients here. The client’s name and town are obligatory entries.
Save data in client database
This box is ticked by default. If it is ticked, then the data will be saved in the client database. Thus, you can enlarge your client database with every order. If you do not want to save the data, unmark the box. If you use existing data from the client database for a new order, they will not be saved a second time. However, if you change these data, the changes will be saved.
Property section
In this section, you can enter data (name, street, postcode, town, phone number) of the property where your work will take place.
Save data in property database
This box is ticked my default, as soon as you enter data into the property section. If it is ticked, then your data will be saved in the property database. Thus, you can extend your property database with every order.
Order description
This section offers space for the description of the work that needs to be done, for guidelines and for comments. The comments you enter here will appear on the printed version of the order so as to be available to your colleagues as well.
Required material or similar
If certain material or similar is required for the work order, you can enter it in this section. You can also point out storage locations in your company, for instance. The comments you enter here will appear on the printed version of the order so as to be available to your colleagues as well.
Duration
You can enter the estimated duration of the order execution here. This will determine the size of the entry box in the timetable. You can change the size of the entry box after dropping it into the timetable. If the entered duration is zero, then the standard duration of 30 minutes will be used.
Approximately
If you tick this box, then the order will be displayed with a tilde (~) in the timetable. This is recommended for orders which can be completed at any time during the day; for instance, if the work location is always accessible or if the order is not urgent.
Record sections
The grey record sections Entered by and last changed cannot be edited and can be affected only indirectly. Since you signed in with your name, the program includes your name, the date and the time in the protocol when a new order is set up. Consequently, you can always access information about the creation and change of an order in the network. It is a valuable documentation for future research and the traceability of order changes.
External data
Most companies possess a client base in the form of a chart or a database. ZePlanner can incorporate these data in its searches. Unfortunately, it is not possible to offer an explanation of the process which would integrate your data into ZePlanner here. However, we would be happy to advise you and find a suitable solution.
If this box is ticked, then the client search will include both the ZePlanner client database as well as your own client data.
Print
Click on Print to print out your order. If you set up a new order and print it immediately, it will be saved automatically.
You can change the layout of the order print-out according to your preferences and requirements. Go to your ZePlanner directory and open the folder PSS. You can open the file order.pss with any text editor. It contains the HTML source code of the print-out, which can be changed at will. The file logo.jpg can be changed as well.
OK
By clicking on OK, you can save the order and close the window.
Search / Client
It is advisable to search for a client when a new order is being set up. You can enter data into the search form in two different ways:
- Enter the search item into the client data and click on Search.
- Click on Search and enter the search item into the search form.
The search function is a very powerful tool, since it is a full-text search working in real-time. Full-text means that you can search for text components too. If, for instance, you are looking for the word Brown, you will get a match with Br already.
If you do not enter any client data and click on Search, then the search form will open and all client data will be displayed in a list. Try entering something into one of the boxes and the list will react to it immediately.
If you tick the box external data, you can include the data from your own database into the search. Consequently, you can either search in the ZePlanner client database only or extend the search to your own pre-existing database as well.

Search / Property
You can search for a property like you can search for a client. However, if you want to access your external property data, you have to import them into ZePlanner with ZePlannerSync.
-
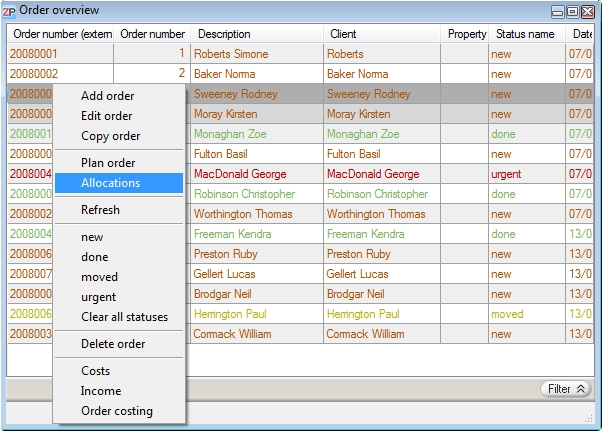
14. Order overview
The window Order overview is open by default. If this is not the case after opening ZePlanner staff scheduling, you can open it by going to Orders –> Order overview.
You can change the order of the columns in the order overview according to your preferences. Press and hold the Ctrl key and click on the column you want to move. Pull it to the desired position. You can also change the size of the columns by clicking on the dividing line between them and pulling on it.
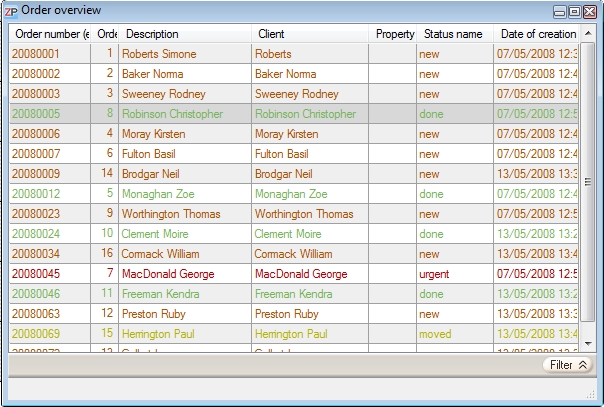
The order overview shows all the entered orders and can be filtered and sorted according to various criteria.
Sorting
You can sort the order overview according to any existing column. If you click on Description, for instance, then the orders will be sorted alphabetically and ascending according to this column. If you click on this box again, the sorting will be descending. You can do the same with all other columns.
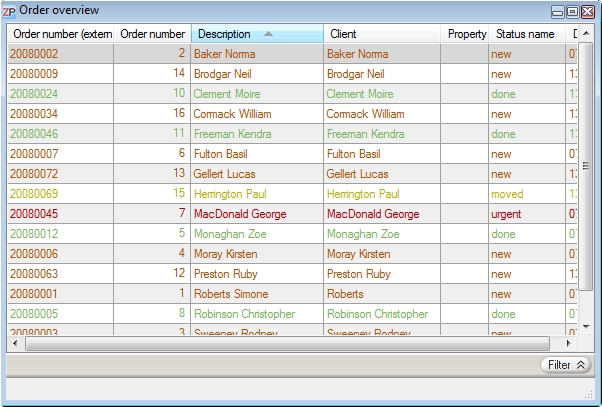
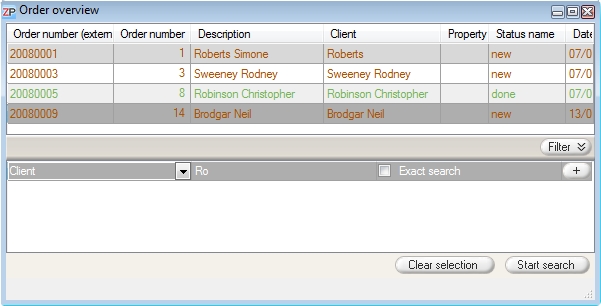
Filtering
Click on the button Filter in order to arrive at the filter function. It allows you to filter the entries in the order overview according to the desired criteria. These criteria include the number, external order number, client name, date and the order status. Select the required criterion from the drop-down menu on the left and type in the relevant letters or the date right next to it. If you select the status as your filtering criterion, then a drop-down menu will appear on the right side where you can choose the status type you want to filter by.
Press Enter or click on the button Start search to filter your orders.
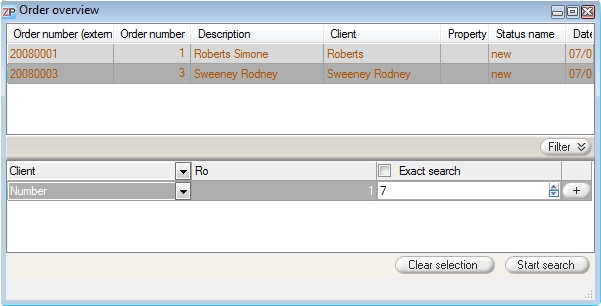
Filter boxes / Number
If you want to reduce the overview to certain order numbers only, enter the smaller number into the middle box and the larger order number into the box on the right.
Filter boxes / Date
If you want the overview to display a certain time period only, enter the starting date into the middle box and the end date into the box on the right.
Filter boxes / Order Status
You can filter the order overview according to the individual order statuses as well.
Exact search
If this box is ticked, then the order overview will be filtered according to the exact letters which you have entered into the box next to the left drop-down menu. By default, however, the filtering will include every occurrence of the entered letter sequence, as for instance in the screenshot above.
Advanced search / Combined filtering criteria
If you want to filter your order overview according to more than one criterion, click on the Plus-Button on the far right of the search row. Another row will appear where you can determine your next criterion.
Filter reset
Click on the button Clear selection to reset the entered search criteria to the default configuration. The values will be reset to the following:
- client name: blank
- exact search: not ticked
- date: first entry to last entry (i.e. all entries)
- order numbers: smallest to largest
- order statuses: all will be displayed
These configurations are the same when you open the window Order overview.
Add order
If you want to add an order, right-click on a random point in the order overview to open the context menu. Adding an order has the same effect as the entering of a new order.
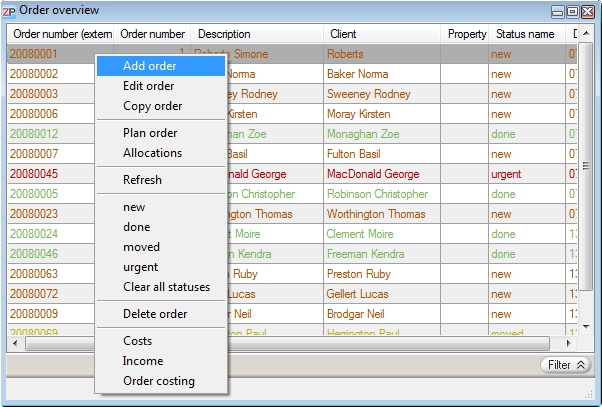
Copy order
If you copy an order, the window New order will appear and contain all the data from the original order. You can now change the data at will. This function is useful if you have to enter orders that are very similar to each other and contain only small changes.
Plan order
This function allows you to plan your order without the drag&drop function. If you click on Plan order, the window Plan long-term order will appear. You can determine the duration of the order and choose which days and time spans you will take into account.
Allocations
Click here to see the allocations belonging to the selected order. You can find more on allocations in this chapter.
Delete order
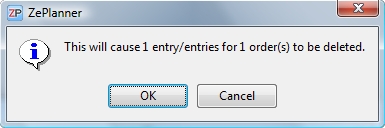
To delete an order, right-click on it to open the context menu. Select Delete order.
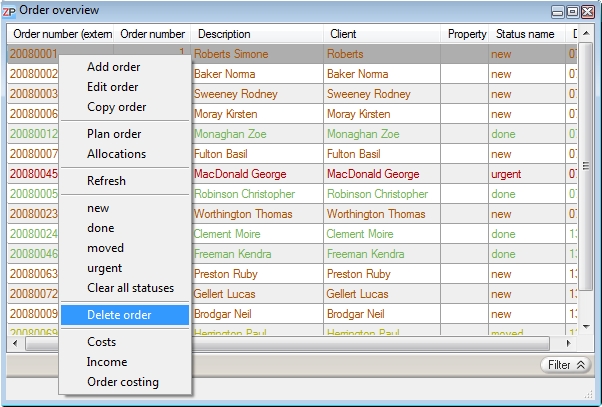
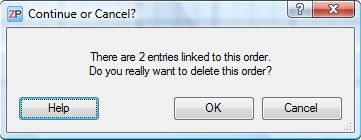
A warning notice will appear and show you how many entries belonging to this order will be deleted. Confirm with OK if you want to delete this order.
Attention: If you press OK now, the order will be deleted permanently.
If you do not want to delete the order, press Cancel.
Expenses
You can enter the expenses for the selected order here. This will be relevant for the Order costing.
Revenues
Enter the revenues for the selected order here. You can find more information in the chapter on Order costing.
Order costing
Calculate your expenses and revenues with the integrated order costing. You will find more information on order costing.
-
15. Order status
Depending on what happened to an order, ZePlanner staff scheduling assigns a certain order status.
There are four different existing kinds of status:
- new
- urgent
- moved
- assigned
Status new
As soon as an order is entered, it receives the status new. This kind of status is the most common one in the order overview.
Status urgent
The urgent status can only be assigned manually, by right-clicking on an existing order in the order overview and choosing urgent.
Status moved
This status is set when you delete an entry of an order from the timetable. It serves as a reminder of the deleted order and signalizes that something should happen with that order. You can specify when this status is supposed to be set in the menu User configurations –> Order overview.
Status assigned
This status is set as soon as an order is entered into the timetable.
Arrow buttons
Every new order will automatically receive the status on the top of the list. With the arrow buttons, you can change the sequence of the statuses. Thus, you can determine yourself which status will be given automatically to new orders.

Set your own status
ZePlanner provides you with the opportunity to set up your own statuses and to change the names and colours of the existing statuses in order to ensure optimal adaptability to your requirements.
Go to the menu Settings –> Status. The window Status list will open and display the four standard statuses in their respective colours. Right-click on a status in order to choose Edit status, Delete status or Add status.
The window Status editor opens, where you can change the name and the colour of the selected status.
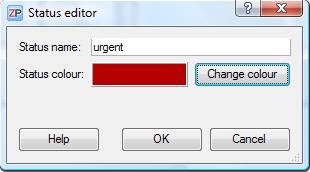
Right-click in the window Status list to select Add status. Again, the window Status editor will open, where you can set the name and the colour of your new status.
-
16. Status assignment
The order overview offers the only possibility to change the order status manually.
To change a status, click on an order to select it and right-click to open the context menu.
Select the status you want to assign to the order from the context menu.
You can choose between new, assigned, moved, urgent, Clear all statuses or any custom status you have added previously.
The function Clear all statuses resets the order to its default status.
The order will then be a conventionally entered order (new) without any assignations.

-
17. Timetable
The timetable is the core of ZePlanner – Staff Scheduling Software. It is not a static window which displays the employees and orders, but a very flexible tool. You can change the scale of the chart and the presentation of the employees according to your individual requirements. In order to offer optimal support to the user, the company labour times are displayed as well.
If the timetable is not displayed, you can open it manually by clicking on the menu Tools –> Timetable.
Go to Settings –> User settings –> Timetable to configure the timetable according to your requirements. You can also do that by right-clicking in the timetable and selecting Settings in the context menu.
The timetable is refreshed regularly in order to keep you up to date. Do not be surprised if an order suddenly appears or disappears; it was simply edited by another user. You can also refresh the timetable manually by pressing the F5 key.
Display
You can choose whether the timetable will display a day, a week or a month. By clicking on the button with the figure 1 circled in red, you can display the current day, week or month. The icon on the right opens the calendar, where you can choose the day you want displayed in a quick manner.
The currently displayed time period in the timetable is indicated in the box next to the calendar icon.
The box on the far right shows the meaning of the colours used in the timetable.
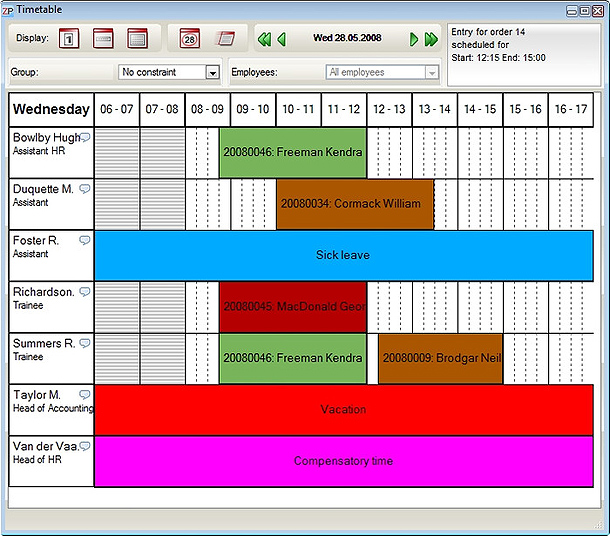
Daily display
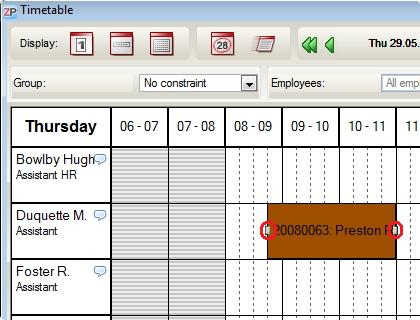
This is the default display mode, which you can see in the screenshot above. It shows all employees. You can determine the time-span you want to be displayed in the user settings.
Spare time
The daily display mode can show the spare time depending on your settings. This is the time which does not belong to the set labour time. It is marked by grey horizontal stripes, as you can see in the screenshot above. For more information on how to determine labour time, click here and for more information on determining whether to display spare time, click here.
Weekly and monthly display
These modes can be restricted to displaying one employee only, in contrast to the daily display. The graphics are different to the daily display as well, as you can see in the following screenshots.
Additional information display
The weekly and monthly view offer three information effects.
- 1) Hold the cursor over an event or an entry in the timetable and a short information about this entry or event will appear next to the cursor.
- 2) Single-click on an event or an entry and the short information will appear in the information box in the top right corner of the timetable.
- 3) Double-click on an event or an entry and the corresponding event window or order window will appear, where you can edit the event or the order.
Comment function
In the daily display mode, you can add a comment to any employee. Click on the little speech bubble next to the employee’s name. A window will appear where you can enter the comment for the employee. This comment will be displayed below the employee’s name in the timetable.
Group
You can select the employee group which you want to be displayed in the timetable. The employees were assigned to groups when their data was first entered into the database.
The group All forms an exception. If it is selected to be displayed, then all employees will be shown.
Employee
You can choose which employees you want to be displayed in the timetable. These employees will then appear in the left column below. This is possible in the weekly and monthly display mode, but not in the daily display.
Timeline
Go to Settings –> User settings or right-click and go to Settings in order to determine the period of the day displayed in the timetable.
Calendar
Click on the blurred icon to open the calendar. To jump to a specific date, simply click on it. Holidays, Saturdays and Sundays are displayed according to your settings.
Navigation buttons
You can navigate between days, weeks and months with the green navigation buttons. The single arrows will take you one display unit forward or back. The double arrows will set the display to one display unit higher (e.g. if you use a daily display and press the double arrow button, the display will change to the same day in the next or the preceding week).
Scalability
You can change the size of the timetable according to your preferences. The only constraint is a certain minimum of height and width, which is necessary to ensure legibility.
Assign entry
To create an entry in the timetable, go to the window Order overview and pull an order from the order overview into the timetable. During the pulling, the cursor will change into a manikin. Drop the order into the desired position in the employee field of the timetable.
By selecting a certain position in the timetable, you determine the employee, the day and the time. The length of the entry is determined by the planned duration of the order. If the entry landed in a wrong position, you can simply click on it and move it to the desired position.
The work duration of an entry can be easily adapted. Each entry has a little grey box at its left and right ends. Click on an entry to select it and then click on one of these little boxes to lengthen or shorten the work duration by extending or shortening of the entry box.
Edit order
Every entry belongs to an order. To edit the order, double-click on the entry and the window Order will open. You have encountered this window in the chapter on setting up a new order. You can now change your data or simply receive more information about the order.
Delete entry
To delete an entry, click on it and press the Del key.
Copy entry
Copying an entry is necessary if:
- You want to assign the same entry to another employee.
- You want to assign the same entry to an employee on a different day.
There are several possibilities of copying an order.
1. Copying entry on the same day
Click on the entry, press the Ctrl key, hold it and pull the entry to the other chosen employee. The entry will be simply copied. This is the quickest and easiest method of copying an entry. However, it can only be used if you apply it within the same day in the timetable.
2. Copying an entry on the same or another day using the clipboard
Click on the entry and press Ctrl+C. Then press Ctrl+V. A copy of the entry will appear in the top left corner of the timetable. Click on the new copy and pull it into the desired position. This process is useful if you need to copy only one entry.
 3. Copying an entry on the same or another day using the tray 3. Copying an entry on the same or another day using the tray
Copying with the help of the tray is the most versatile way of copying an entry. It is suitable for one or more entries on the same or on other days.
Click on an entry and pull it into the Tray window. If the Tray window is not open, go to the menu Tools –> Tray to open it. Pull all entries you want to copy into the tray.
You can see the entries pulled over in the tray. To copy an entry, pull it out of the tray into the timetable. Repeat until you have copied all entries.
Note: If the copy function does not work, it might be a result of certain user settings.
In Settings –> User settings –> Timetable you can find the box Delete entry after moving out of timetable. If the box is ticked, the entry is merely moved and no copy is made in the tray.
There is another setting in User settings –> Tray, namely Delete entry after moving out of tray. If the box is ticked, then the entry will be deleted after you move it out of the tray.
Depending on your settings, you will achieve movement, single copy or multiple copies. The default setting is on multiple copies.
Each of these methods has its advantages, but only the combination of all three makes efficient work possible.
Undo
The timetable includes an Undo function. If you make a mistake, press Ctrl+Z and the last step will be cancelled. You can repeat Ctrl+Z as many times as it takes to rectify the situation. You can also find this function in the menu Edit –> Undo.
-
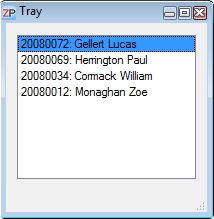
18. Tray
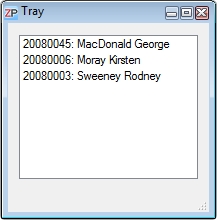 The tray is modelled on the clipboard you control with Ctrl+C and Ctrl+V. The essential difference here is the fully functioning drag&drop, i.e. you can move or copy entries simply by pulling them from the order overview or the timetable into the tray. This works the other way around as well, from the tray into the timetable (but not into the order overview). The tray is modelled on the clipboard you control with Ctrl+C and Ctrl+V. The essential difference here is the fully functioning drag&drop, i.e. you can move or copy entries simply by pulling them from the order overview or the timetable into the tray. This works the other way around as well, from the tray into the timetable (but not into the order overview).
In order to delete an entry in the tray, click on it and press the Del key.
You can determine whether the tray will be saved with the shutting down of ZePlanner and then restored when you open the program again or whether its contents will be deleted. Go to User settings to select the option that suits your requirements.
You will also find the function Delete entry after moving out of tray in the user settings. You can find a description of its effects in the chapter on the timetable.
Advice: The tray belongs to the core concept of ZePlanner. In order to work as efficiently as possible, it should always be opened.
-
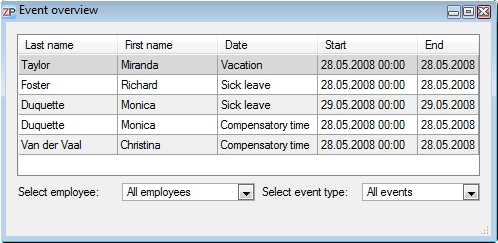
19. Events
The following entries constitute events:
- sick leave
- vacation
- compensatory time
You have been introduced to these events in the user settings, where you could assign colours to them. You can also create your own kinds of events, which is described further below.
Events differ a little from entries.
- Events cannot be moved.
- Events cannot be resized.
- Events are not connected to an order.
Events have a long-term character, which is why they are built up differently than entries. However, that poses no disadvantage as regards handling.
Create your own events
You can create your own events according to you personal preferences or regional requirements and assign colours to them. Go to the menu Settings –> Event types. The window Event type will appear. Right-click to open the context menu where you can choose whether you want to edit an existing event type or to create a new one. The window Edit event type will appear where you can set the name and colour of the new event type.
Enter an event
There are two ways of entering an event.
The quickest way is through the timetable. Right-click on the employee to whom you want to assign an event and select Assign event in the context menu. The window Edit events will appear where you can set the event data.
Alternatively, you can open the window Event overview in the menu Tools –> Event overview.
Right-click in the window Event overview and select Add event from the context menu.
The window Edit event will appear.
Select an employee and an event type. Choose the starting date and time as well as the end date and time. Confirm with OK. The entry is now created and appears in the list. After the actualization of the timetable, the event will be displayed there as well. You can also refresh the timetable manually by pressing F5.
Change event
You have several possibilities of changing an event.
- 1. Double-click on an event in the timetable. The window Edit events will appear. Enter your changes and confirm with OK.
- 2. Right-click on the entry in the window Event overview and select Edit event in the context menu. The window Edit events will appear. Enter your changes and confirm with OK.
- 3. Double-click on the entry in the window Event overview. The window Edit events will appear. Enter your changes and confirm with OK.
Delete event
There are two ways to delete an event.
- 1. Select the entry you want to delete in the Event overview window and right-click to open the context menu.
Select Delete event.
- 2. Select the entry you want to delete in the Event overview window and press the Del key to delete the event.
Display function in the Event overview window
The event overview can get very long over the course of time. Therefore, the sorting settings are essential for an efficient way of working.
You can sort the entries by the overview columns. Click on the respective column title to change the sorting order.

The filtering functions form another way of restricting the displayed entries. You can filter by employee or by event type. You can also combine these two filter settings if you wish.
-
20. Collisions
Collisions can occur if you enter an event for an employee while there are already entries on that/those day(s).
In such cases, ZePlanner will alert you to the deletion of the existing entries. If you do not want that to happen, click on Cancel.
You will receive more information on how to recognize and re-assign such deleted entries in the chapter on collision treatment.
-
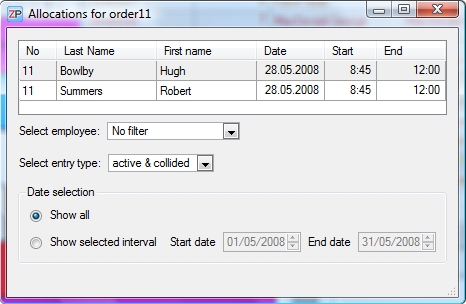
21. Allocations
An allocation represents the linking of an order to its entries in the timetable, or in other words, the depiction of the individual entries concerning the time and person they are allocated to.
ZePlanner provides you with two types of allocation overview.
Global allocation overview
You can find the global allocation overview in the menu Orders –> Allocation overview. Click on it and the window Allocation overview will appear. All allocations will be displayed here.
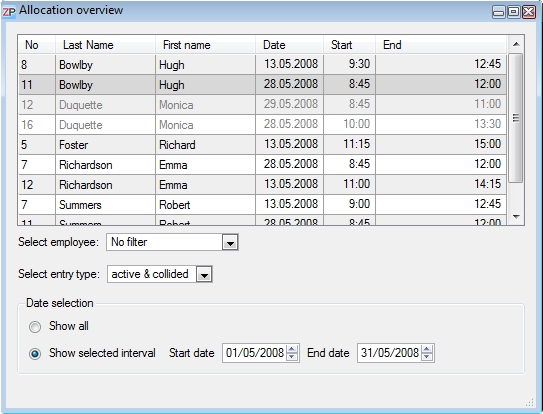
You can see the number of the order as well as the allocated employee and time. Since all entries appear in the allocation overview, you can apply two filter functions to facilitate your work.
Filter function Employee
You can restrict the list to the allocations of one employee only. Go to the box Select employee to use this function.
Filter function Entry type
In the box Entry type, you can select which entry types to display. You can choose between active & collided, active only or collided only.
An active entry is any entry that appears in the timetable.
A collided entry is an entry which has been overwritten by an event and thus been deleted.
Order allocations
In contrast to the global allocation overview, the Order allocations window displays only the allocations belonging to one order.
The order allocations can be viewed directly from the window of the respective order if you click on the button Allocated. Alternatively, you can right-click in the order overview and go to Allocations in the context menu. Both methods have the same result.
The order allocation has the same functions as the global allocation window. Only the window title indicates that it is an order allocation and which order it belongs to.
-
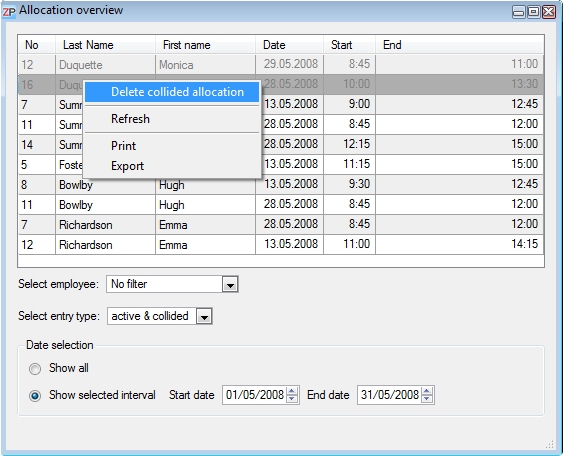
22. Collision treatment
Unfortunately, the allocation of deleted entries cannot be done automatically since there are too many criteria to be considered.
A typical case for the appearance of a collision is the unexpected absence of an employee. For instance, your employee has taken ill and cannot work for the following four weeks. You will thus create the event sick leave. After the creation, ZePlanner will inform you that several entries were deleted.
The orders to which the entries belonged must be allocated to other employees manually.
Select the absent employee in the allocation overview and possibly also the filter collided only in order to get the best overview of the deleted entries.
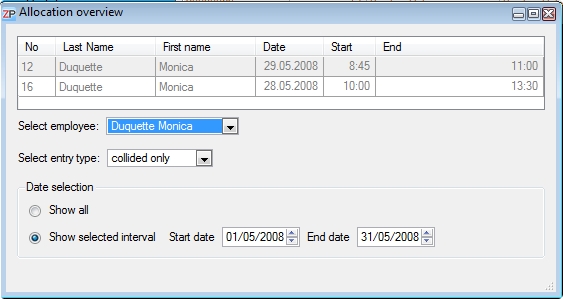
Now you can see only the collided entries of Duquette Monica in the allocation overview.
Two entries were deleted in our example. To be able to re-allocate the respective orders, go to the order overview and search for these two orders. You can re-enter the orders into the timetable via drag&drop from there.
The allocation overview serves only to inform you and to support you in the re-allocation. After you have re-allocated the orders or solved the situation differently, you can delete the respective collisions in the allocation overview.
Delete collisions
You can delete a collision by right-clicking on the respective entry in the allocation overview and selecting Delete collision in the context menu.
-
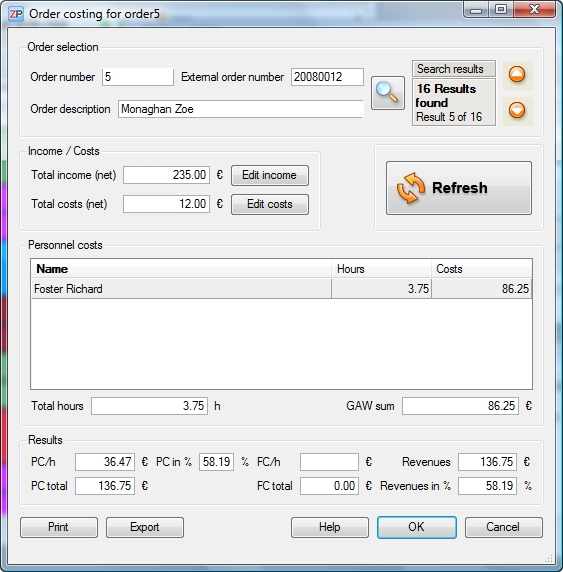
23. Order costing
The ACalc order costing is a tool for the calculation of personnel-concerned order costs, profit contribution (PC), fixed costs (FC) and revenues.
Press F3 or go to the menu Orders –> Order costing or right-click on an order in the order overview. You can then select Order costing from the context menu.
Select the required order in the order selection. You can either choose an order directly (right-click on order in Order overview –> Order costing) or search for it in the order selection. You can search by order number or order description.
If you leave the search boxes for order number and order description blank, then all entered orders will be displayed in the box for search results. The individual results can be viewed successively by clicking on the up- and down-arrows.
If you wish, you can enter the respective figures in the boxes for income and costs (Edit income –> Right-click –> Enter income; Edit costs –> Right-click –> New cost). If you enter any data here, please click on Refresh afterwards to save it.
The current personnel costs are totalled in Personnel costs and displayed as GAW (Gross Average Wage) sum. If you change entries of orders in the timetable, you have to click on Refresh so that the results can be recalculated.
The Results display the profit contribution (PC), fixed costs (FC) and revenues. To receive meaningful results, you have to enter every income and cost.
-
24. Activation
When you download ZePlanner – Staff Scheduling Software, you can decide which version you would like to test: ZePlanner easy or ZePlanner standard. You can use these two versions with all their functions for 30 days. After this test period, you can continue to use ZePlanner if you purchase an full version.
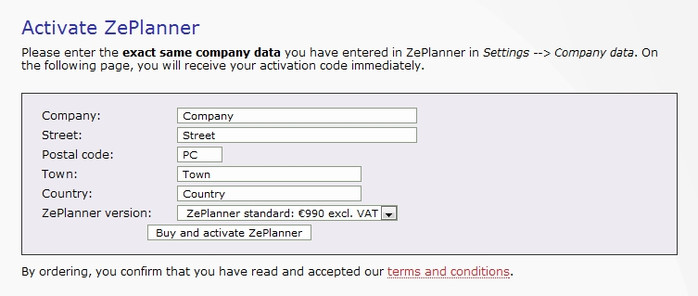
After the test period, a window will appear upon starting ZePlanner which will direct you towards the website for the generation of an activation code. In order to receive such a code, you have to enter your company data (name and location at least) into Settings–> Company data in the ZePlanner version you have downloaded. After you have received your activation code, you will be directed to a homepage where you enter your billing address. Thus, you can simply continue to use your ZePlanner version immediately. An invoice will be sent to you within a short time.
If you are interested in ZePlanner pro, please order via the homepage Activation as well. We will contact you to support you with the installation as well as the configuration of the data interface and send the dongle (hardware protection device) as soon as possible.
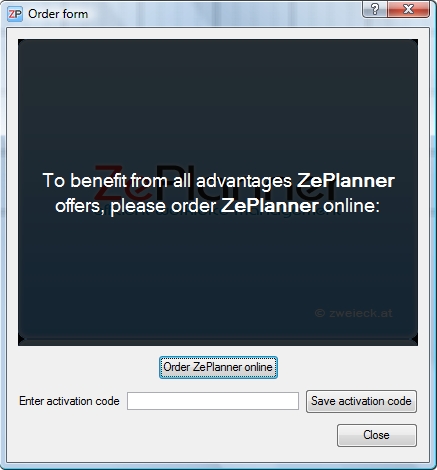
Activation instructions
When you start ZePlanner staff scheduling, a window directing you towards the website for ordering and purchasing will appear. Please click on Order ZePlanner online to be referred to the homepage where your activation code will be generated.
The activation homepage will appear. Please enter the company data in the exact same way you have entered them in the company settings in ZePlanner and choose your preferred ZePlanner version. Confirm your entered data and order ZePlanner with a click on the button Buy and activate ZePlanner.
You will receive your activation code on the next page.
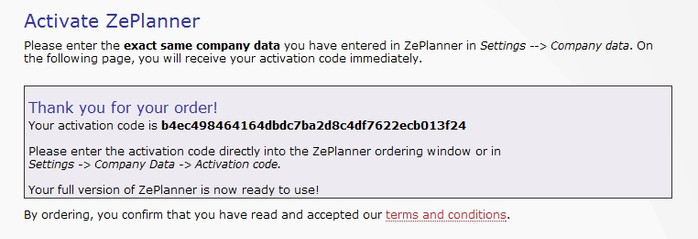
Please highlight the activation code and copy it with Ctrl+C or by right-clicking and selecting Copy in the context menu. Paste the code in the box labelled Enter activation code in the order form (Ctrl+V or rightclick+Paste) and click on Save activation code.
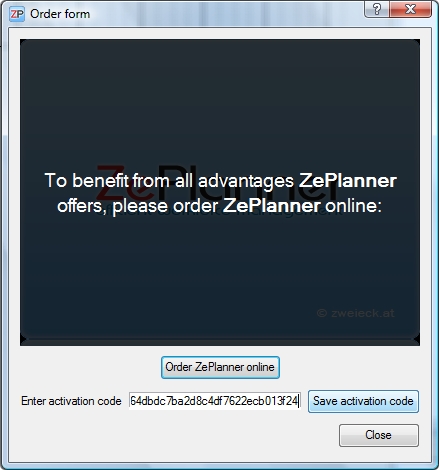
The activation code has now been entered into your company data automatically. Instead of entering the code into the order form, you can also enter it into the company data window yourself (Settings –> Company data). Please note that the data must be entered in exactly the same way used during the generation of the code. Conversely, if you enter your company data into ZePlanner first, you will have to use these exact data when generating the code.
-
[close all]
|
Shopping Cart
|

 Test for free
 Buy ZePlanner
 Get in Touch