17. Timetable
The timetable is the core of ZePlanner – Staff Scheduling Software. It is not a static window which displays the employees and orders, but a very flexible tool. You can change the scale of the chart and the presentation of the employees according to your individual requirements. In order to offer optimal support to the user, the company labour times are displayed as well.
If the timetable is not displayed, you can open it manually by clicking on the menu Tools –> Timetable.
Go to Settings –> User settings –> Timetable to configure the timetable according to your requirements. You can also do that by right-clicking in the timetable and selecting Settings in the context menu.
The timetable is refreshed regularly in order to keep you up to date. Do not be surprised if an order suddenly appears or disappears; it was simply edited by another user. You can also refresh the timetable manually by pressing the F5 key.
Display
You can choose whether the timetable will display a day, a week or a month. By clicking on the button with the figure 1 circled in red, you can display the current day, week or month. The icon on the right opens the calendar, where you can choose the day you want displayed in a quick manner.
The currently displayed time period in the timetable is indicated in the box next to the calendar icon.
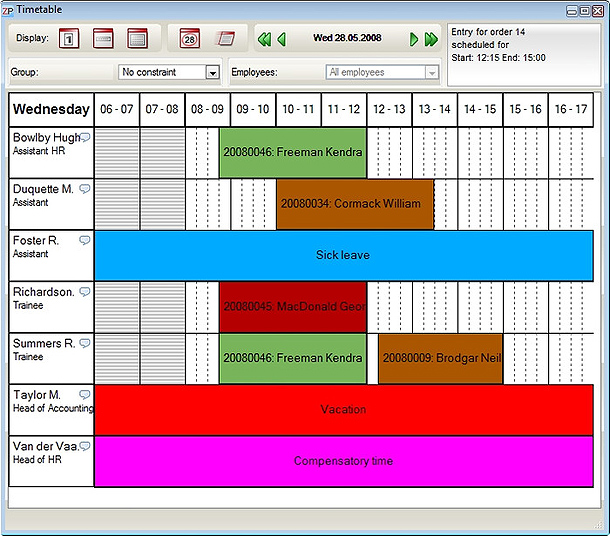
The box on the far right shows the meaning of the colours used in the timetable.
Daily display
This is the default display mode, which you can see in the screenshot above. It shows all employees. You can determine the time-span you want to be displayed in the user settings.
Spare time
The daily display mode can show the spare time depending on your settings. This is the time which does not belong to the set labour time. It is marked by grey horizontal stripes, as you can see in the screenshot above. For more information on how to determine labour time, click here and for more information on determining whether to display spare time, click here.
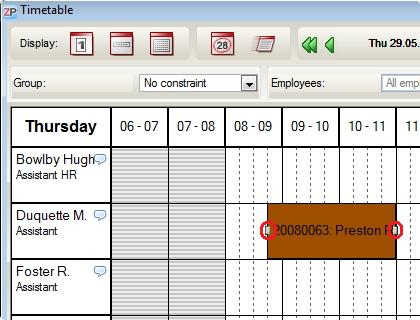
Weekly and monthly display
These modes can be restricted to displaying one employee only, in contrast to the daily display. The graphics are different to the daily display as well, as you can see in the following screenshots.
Additional information display
The weekly and monthly view offer three information effects.
- 1) Hold the cursor over an event or an entry in the timetable and a short information about this entry or event will appear next to the cursor.
- 2) Single-click on an event or an entry and the short information will appear in the information box in the top right corner of the timetable.
- 3) Double-click on an event or an entry and the corresponding event window or order window will appear, where you can edit the event or the order.
Comment function
In the daily display mode, you can add a comment to any employee. Click on the little speech bubble next to the employee’s name. A window will appear where you can enter the comment for the employee. This comment will be displayed below the employee’s name in the timetable.
Group
You can select the employee group which you want to be displayed in the timetable. The employees were assigned to groups when their data was first entered into the database.
The group All forms an exception. If it is selected to be displayed, then all employees will be shown.
Employee
You can choose which employees you want to be displayed in the timetable. These employees will then appear in the left column below. This is possible in the weekly and monthly display mode, but not in the daily display.
Timeline
Go to Settings –> User settings or right-click and go to Settings in order to determine the period of the day displayed in the timetable.
Calendar
Click on the blurred icon to open the calendar. To jump to a specific date, simply click on it. Holidays, Saturdays and Sundays are displayed according to your settings.
Navigation buttons
You can navigate between days, weeks and months with the green navigation buttons. The single arrows will take you one display unit forward or back. The double arrows will set the display to one display unit higher (e.g. if you use a daily display and press the double arrow button, the display will change to the same day in the next or the preceding week).
Scalability
You can change the size of the timetable according to your preferences. The only constraint is a certain minimum of height and width, which is necessary to ensure legibility.
Assign entry
To create an entry in the timetable, go to the window Order overview and pull an order from the order overview into the timetable. During the pulling, the cursor will change into a manikin. Drop the order into the desired position in the employee field of the timetable.
By selecting a certain position in the timetable, you determine the employee, the day and the time. The length of the entry is determined by the planned duration of the order. If the entry landed in a wrong position, you can simply click on it and move it to the desired position.
The work duration of an entry can be easily adapted. Each entry has a little grey box at its left and right ends. Click on an entry to select it and then click on one of these little boxes to lengthen or shorten the work duration by extending or shortening of the entry box.
Edit order
Every entry belongs to an order. To edit the order, double-click on the entry and the window Order will open. You have encountered this window in the chapter on setting up a new order. You can now change your data or simply receive more information about the order.
Delete entry
To delete an entry, click on it and press the Del key.
Copy entry
Copying an entry is necessary if:
- You want to assign the same entry to another employee.
- You want to assign the same entry to an employee on a different day.
There are several possibilities of copying an order.
1. Copying entry on the same day
Click on the entry, press the Ctrl key, hold it and pull the entry to the other chosen employee. The entry will be simply copied. This is the quickest and easiest method of copying an entry. However, it can only be used if you apply it within the same day in the timetable.
2. Copying an entry on the same or another day using the clipboard
Click on the entry and press Ctrl+C. Then press Ctrl+V. A copy of the entry will appear in the top left corner of the timetable. Click on the new copy and pull it into the desired position. This process is useful if you need to copy only one entry.
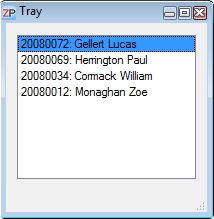 3. Copying an entry on the same or another day using the tray
Copying with the help of the tray is the most versatile way of copying an entry. It is suitable for one or more entries on the same or on other days.
Click on an entry and pull it into the Tray window. If the Tray window is not open, go to the menu Tools –> Tray to open it. Pull all entries you want to copy into the tray.
You can see the entries pulled over in the tray. To copy an entry, pull it out of the tray into the timetable. Repeat until you have copied all entries.
Note: If the copy function does not work, it might be a result of certain user settings.
In Settings –> User settings –> Timetable you can find the box Delete entry after moving out of timetable. If the box is ticked, the entry is merely moved and no copy is made in the tray.
There is another setting in User settings –> Tray, namely Delete entry after moving out of tray. If the box is ticked, then the entry will be deleted after you move it out of the tray.
Depending on your settings, you will achieve movement, single copy or multiple copies. The default setting is on multiple copies.
Each of these methods has its advantages, but only the combination of all three makes efficient work possible.
Undo
The timetable includes an Undo function. If you make a mistake, press Ctrl+Z and the last step will be cancelled. You can repeat Ctrl+Z as many times as it takes to rectify the situation. You can also find this function in the menu Edit –> Undo.
 Test for free
 Buy ZePlanner
 Get in Touch